Aliens and Avatars – Explorative Product Deveploment in Action

On this years W-JAX I had the pleasure to host a session about explorative product development. The session was about the appropriate mixture of methods and software architecture especially, but not only, for projects in the pioneering phase. A good example of the Creative Software Workbench in action. You can see the session recording on entwickler.de (subscription required).

Fintech Success Story

In 2017 PLEUS Consulting supported Yareto GmbH in the development of their new independent comparision site for the automotive finance industry.
Yareto is a fintech company that specializes in automotive financing. In 2016 the corporate startup was founded to build a brand new comparision site for the automotive finance industry. The site enables car dealers to compare credit offers in the areas of sales financing and purchase financing. Lenders get access to sales channels they couldn’t serve before.

PLEUS Consulting supported Yareto in setting up a Creative Software Workbench. The Creative Software Workbench aligns technology, processes and people in a way that creates an environment in which high quality digital products can be developed in short time.

The front-ends were developed using modern web technologies such as Java-/Typescript, HTML5, CSS and Angular. For the backend Java Enterprise (JEE) and a Sustainable Service Design approach was utilized to design and build a backend with a high degree of reuse and scalability. The service landscape was established using Domain Driven Design principles. Operations was performed using cloud platforms.

On the technical side, PLEUS Consulting supported the teams as Lead Developer. In the area of agile techniques, PLEUS Consulting supported the development teams as Agile Coach. The combination of those roles worked quite well especially in the phases of seed and growth. With these roles the company received thorough support in the areas of technology and methodology.

The project has shown that with a combination of modern technologies, agile approaches and the right people a very short concept to market cycle can be achieved, creating competitive advantages. This is what the Creative Software Workbench is all about.

You can read more details about the project in the official success story. More info about the Creative Software Workbench can be found on the official website.

Don’t leave broken windows unfixed

The Broken Windows theory was developed in 1982 in the US in the area of crime prevention. The theory describes norm-setting effects of urban disorder. Simply put, it means that if the windows of a building are broken the likelihood of further broken windows increases. This is a metaphor to stress that environmental and cultural settings have a huge impact on the behavior and norms of people.

For instance, if one window is already broken and nobody cares about it, it seems to be acceptable to break other windows as well. Broken windows encourage people to break windows. If all the windows of a building are intact, the inhibition threshold to break windows is much higher. Although the theory was developed in the domain of criminology, it can also be applied in software development projects. I am sure everyone working in IT already knows about broken windows.

Examples of broken windows on a technical level are:

  • Unfixed bugs, e.g. a wrong calculation
  • Violating integrity rules, e.g. microservice design principles
  • Not using ubiquitous language but lots of synonyms and technical slang instead, making it hard to understand the codebase

As broken windows produce more broken windows over time the software might become harder and harder to maintain which sometimes requires a complete rewrite after a few years.

How can broken windows at the technical level be fixed and avoided?

One way is to understand that not just functional misbehavior in applications, e.g. the inability to save customer data, is treated as an error. Violating design principles and coding conventions should also be treated as errors which have to be fixed as soon as possible. These errors are usually not detected by functional testers but by developers themselves and their colleagues. If a developer spots a violation, he/she should create an issue in the bug tracking system. Over time the code quality increases and broken windows are repaired. A culture of constructive criticism helps to foster this.

At the level of agile methods examples are:

  • People not attending standup meetings
  • Teams not delivering what they promised during sprint planning
  • Team members working on unplanned things

Over time the development process might deteriorate and create fewer and fewer predictable outcomes.

What can we do to prevent that?

It is important to address misbehavior when it happens. Do not wait until it becomes normal and is replicated by other team members. Just like a scrum master teaches the team the value of the scrum principles and artefacts and guides them on their way to an agile mindset. Mature agile teams are able to address broken windows for instance during their retrospectives.

People in software development teams are prone to the broken window effect as they do not work in isolation. They align their behavior to the accepted principles of the group. If the group includes bad role models and shows misbehavior or a bad coding style (both are broken windows) the team is likely to follow. After a while the code smells and bad habits become normal (although it doesn’t smell anymore ;-)). Broken windows produce more broken windows even when they don’t produce any immediate problems. Therefore, it is important to fix them as soon as possible. If not, the likelihood of code- or team-erosion increases. If broken windows are fixed on time, the teams and codebase can maintain a high level of quality which is required to deliver software quickly and reliably.

Keep improving…

Bank11 Success Story

In 2016 PLEUS Consulting supported Bank11 in the development of their brand new sales financing system VICTOR 3.0.

Success Story Bank11 is a credit institution that specializes in sales financing. In 2016 the bank decided to replace their existing software with something new. To be able to meet the challenging requirements in terms of quality, customer satisfaction and process efficiency they decided to build their own solution.

The front-ends were developed using modern web technologies such as Javascript, HTML5, CSS and Angular. For the backend Java Enterprise (JEE) and a Sustainable Service Design approach was utilized to design and build a backend with a high degree of reuse and scalability. The service landscape was established using Domain Driven Design principles.

On the technical side, PLEUS Consulting supported the teams as Master Developer and Architecture Owner. In the area of agile techniques, PLEUS Consulting supported the development teams as Scrum Master and Agile Coach. Although not 100% tension free, the combination of those roles worked quite well. With these roles the bank received thorough support in the areas of technology and methodology.

From the beginning we tried to align technology and business as much as possible, creating a people centered architecture. Central to the strategy were BPMN process models, graphical business rules and visual service contracts. In order to create appealing front-ends for the car dealers and the back office of the bank we worked closely with user interface specialists which were members of the cross functional teams. Web stack technologies allowed us to create individual and great looking front-ends. Agile frameworks such as Scrum organized the development teams and created valuable software together with the customer within a short period of time.

The project has shown that with a combination of modern technologies and agile approaches a very short concept to market cycle can be achieved, creating competitive advantages. It also demonstrates that it is possible to establish an agile culture in rather traditional business domains.

You can read more details about the project in the official success story. If you want to find out more come to watch my talks at JAX 2017 in Mainz.

JAX Sessions about Agile and Architecture

Between the 8th and 12th May 2017 JAX will be taking place at Rheingold Halle in Mainz.

On the 8th I am going to give a presentation about Agile trends, myths and best practices. . In this talk I will show why Agile is the way to go and what it actually means to work with Agile rather than just applying Scrum or Kanban rules.

On the 9th I will share insights from a banking projekt in 2016. This technical talk will show how to combine current architectural patterns such as sustainable service orientation, process automation and business rules to create an architecture that evolves around people.

You can see the timeslots on the JAX website. I look forward to seeing you there.

Sustainable Microservices with Spring Boot

In my article series about Sustainable Service (SSD) design I described a design and implementation approach to develop services with technical decoupling to improve reuse.

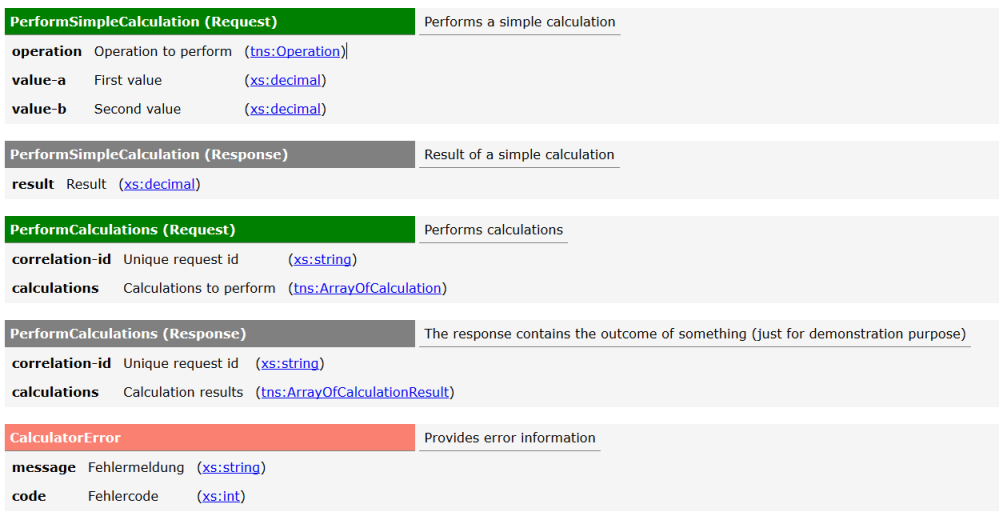
At the level of IT infrastructure sustainable means that service implementations can be used in different technical environments without a major rewrite. Technical decoupling is a key factor to achieve that. In the second part of the article I have provided an example on how to implement SSD with a JEE stack. Part of this example is a  calculator service which performs simple arithmetic operations.

Due to the technical decoupling, services can be moved with little effort, for example from a JEE Server to other runtimes like Apache Karaf (OSGi) or Spring Boot, just to name a few.

In this blog post I would like to demonstrate how to move the Calculator JEE example from Wildfly JEE Container to Spring Boot. The main difference in the Spring Boot deployment is the fact that each service is bundled with its own HTTP server. The deployment unit is not a JEE EAR which is deployed on a JEE Server, but a so-called über-jar which includes the complete HTTP infrastructure. The über-jar just requires a Java runtime and no additional infrastructure. This kind of deployment creates a high level of service autonomy which is often used in Microservice architectures.

Let me tell you a little story:

Assume Peter is an IT professional who is working on a fictitious software project for a large insurance company. One day a colleague, let’s call him Max, from another project enters Peterʼs office and starts the following conversation:

Max: I’ve heard you’ve implemented some very useful services. I saw them on your service repository Wiki and think we could use some of them in our new project.

Peter: Yes, that’s right. I am glad we’ve created something valuable.

Max: But…I also heard that you are using a full blown JEE Applicationserver to run your services.

Peter: Yes, this is the best runtime for our project, as it helps us to manage centralized deployment. Each service is deployed in its own EAR file, which gives us great flexibility.

Max: For our project we decided to use Spring Boot and deploy each service together with its own HTTP Server. I guess we can’t use your service without a major rewrite then?

Peter: You don’t have to rewrite the services because we’ve implemented them based on Sustainable Service Design.

Max: Sounds great, could you please show me what we have to do to run your services?

Peter: Of course. Let’s start by downloading the Calculator Example, which demonstrates how to build SSD-Services for JEE. First, build the example like so:

mvn clean install

Peter: Now you have the following maven artifacts (jars) in your local maven repository.

net.pleus.services.calculator:calculator_api
net.pleus.services.calculator:calculator_impl

Peter: You can use this artifacts without any modifications.

Max: Ok, I can see that api and impl form the core service. Our project decided to just use JSON/HTTP as the protocol for service interaction. I saw that in the orignal example REST, EJB and SOAP are provided.

Peter: No problem, just add the bindings when you need them. With SSD you can add additional bindings any time. So you can start with the bare minimum and expand later. This gives you great flexibility. Add the JSON/HTTP-binding first.

Max: In the original example I saw that it was called REST-Binding.

Peter: Although the original calculator example uses the term REST-Binding, I prefer to call it JSON/HTTP-Binding because it better describes what it is. An SSD-Service can manage multiple resources (nouns) and can support arbitrary operations (verbs). This representation is very well suited to modelling the real world (the domain) which is important for proper service design and reuse. If you really have the requirement to create REST-Style APIs, you can do it in the respective binding. But be aware that in this case you create a variation of your service contract (subcontract) which also relies on HTTP-Verbs instead of the verbs in the primary contract. Although it is possible, I would not recommend it. Ok, let’s not digress but move on with Spring Boot.

Max: Ok, please show me how to create the bootable service.

Peter: Sure, start with the following Maven-POM , which is based on the tutorial Building a RESTful Web Service with Spring Boot.

<project xmlns="http://maven.apache.org/POM/4.0.0" xmlns:xsi="http://www.w3.org/2001/XMLSchema-instance"
    xsi:schemaLocation="http://maven.apache.org/POM/4.0.0 http://maven.apache.org/xsd/maven-4.0.0.xsd">
    
    <modelVersion>4.0.0</modelVersion>

    <parent>
        <groupId>org.springframework.boot</groupId>
        <artifactId>spring-boot-starter-parent</artifactId>
        <version>1.3.5.RELEASE</version>
    </parent>

    <groupId>net.pleus.services.calculator</groupId>
    <artifactId>calculator_boot</artifactId>
    <version>1.0-SNAPSHOT</version>
    <name>Services :: calculator :: boot</name>

    <dependencies>
        <dependency>
            <groupId>org.springframework.boot</groupId>
            <artifactId>spring-boot-starter-web</artifactId>
        </dependency>
        <dependency>
            <groupId>org.springframework.boot</groupId>
            <artifactId>spring-boot-starter-test</artifactId>
        </dependency>
        <dependency>
            <groupId>net.pleus.services.calculator</groupId>        
            <artifactId>calculator_api</artifactId>
            <version>1.0-SNAPSHOT</version>
        </dependency>
        <dependency>
            <groupId>net.pleus.services.calculator</groupId>        
            <artifactId>calculator_impl</artifactId>
            <version>1.0-SNAPSHOT</version>
        </dependency>
    </dependencies>
    
    <properties>
        <java.version>1.8</java.version>
    </properties>

    <build>
        <plugins>
            <plugin>
                <groupId>org.springframework.boot</groupId>
                <artifactId>spring-boot-maven-plugin</artifactId>
            </plugin>
        </plugins>
    </build>

</project>

Peter: From lines 25-34 you can see the existing calculator jars. The rest is required to create a minimal Spring Boot über-jar. Now we create a JSONHTTP-Binding using Spring MVC.

@RestController
@RequestMapping(value = "/services/calculator/rest/api", method= RequestMethod.POST)
public class CalculatorJSONHTTPBinding {

    @Autowired
    private Calculator service;

    @RequestMapping(value = "/performcalculations", method= RequestMethod.POST)
    @ResponseBody
    public PerformCalculationsResponse performCalculations(@RequestBody PerformCalculationsRequest request) {
        return service.performCalculations(request);
    }
}

Peter: To add this binding we need some boilerplate code. First an application class.

@SpringBootApplication
public class Application {

    public static void main(String[] args) {
        ApplicationContext ctx = SpringApplication.run(Application.class, args);
    }
}

Peter: And second a little factory to create a service instance, so that it can be injected using @Autowired in the binding.

@Configuration
public class Factory{
    @Bean public Calculator createCalculator(){
        return new CalculatorImpl();
    }
}

Peter: That’s all. Build it and run the über-jar with the following command.

mvn clean install
java -jar target/calculator_boot-1.0-SNAPSHOT.jar

Max: Wow, that’s all? Can you prove that it works?

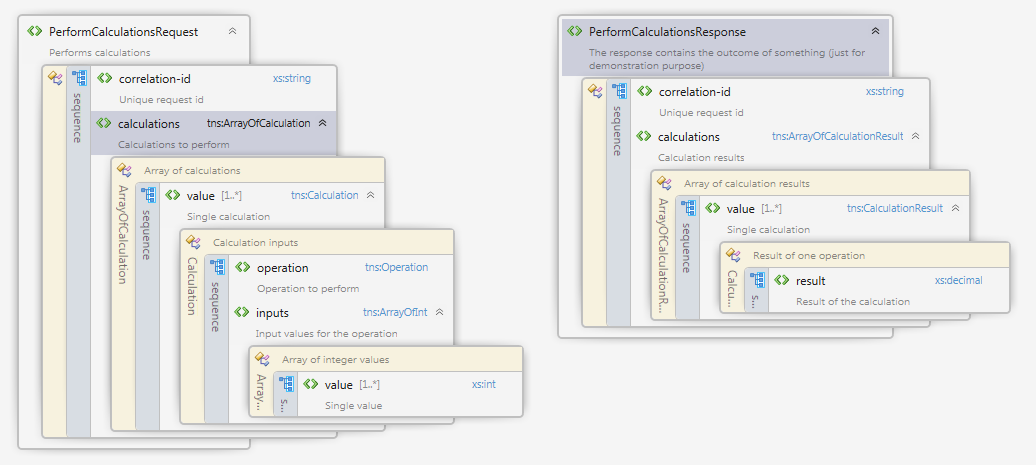
Peter: Of course. For example fire up SOAP-UI and send this request to the service at http://localhost:8080/services/calculator/rest/api/performcalculations

{
	"correlationid":"4711",
	"calculations": {
	 "value": [
	   {
	     "operation": "ADD",
	     "inputs": {
	       "value": ["1","2"]
	     }
	   }]
	}
}

Peter: This is what you get.

{
   "correlationid": "4711",
   "calculations": {"value": [{"result": 3}]}
}

Max: Can I reuse the existing binding from the original example instead of the one we created?

Peter: Yes, but it is technically coupled to JAX-RS. If you want to use it please read the blog Using JAX-RS With Spring Boot Instead of MVC.

Max: I saw that the original example contains a handy Java client to access the service. Can I reuse it?

Peter: You mean net.pleus.services.calculator:calculator_binding_rest_client. Yes, you can use it as it is. And it makes sense, as it gives you a nice fluent Java-API to access the service. First add the following Maven artifact to your pom.xml.

        
            net.pleus.services.calculator        
            calculator_binding_rest_client
            1.0-SNAPSHOT
        

Peter: Now you can use the Java client in your tests like this.

@Before
public void setUp() throws Exception {
  client = new CalculatorClient("localhost",port);
}
    
@Test
public void add() throws Exception {

  // Create calculation inputs
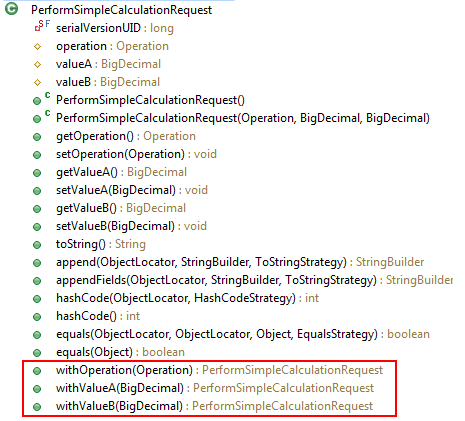
  Calculation calculation = new Calculation()
   .withOperation(Operation.DIVIDE)
   .withInputs(new ArrayOfInt()
     .withValue(9,3,2)
   );
				 
  // Create request
  PerformCalculationsRequest request = new PerformCalculationsRequest()
    .withCorrelationid(UUID.randomUUID().toString())
    .withCalculations(new ArrayOfCalculation().withValue(calculation));
		
  // Call service	
  PerformCalculationsResponse response = client.performCalculations(request);

  // Check correlation
  Assert.assertEquals(request.getCorrelationid(), response.getCorrelationid());
		
  // Check result
  Assert.assertEquals(new BigDecimal(1.5), response.getCalculations().getValue().get(0).getResult());	
}

Peter: When you run the test Spring Boots starts the HTTP Server and calls the service.

Max: It seems that I can easily run your service and even use the Java client within Spring Boot. We have a sustainable service and a lightweight runtime. Perfect! That saves us a lot of time and money. Maybe we should try to evolve the service together? This way we could create further value for other projects.

Peter: Good idea! If you want to try the example I’ve packaged it for download. For convenience it also contains identical copies from the original calculator example.
Feel free to use it as you like.

Turn contracts into documentation

In part one I’ve shown how to turn contracts into code. In this part I am going to show how to turn contracts into documentation.

Using the contract as a model for both code generation and documentation can save a lot of time. That is because the contract represents a single source of truth, which can be used by developers and business people alike. Just like you would probably do when you design BPMN models together with people from business you can design service contracts in the same way. Designing service contracts together with business people fosters the notion of services as business assets rather than just technical artefacts. Beside the time savings this creates mutual understanding amongst developers and business people. It facilitates collaboration and aligns business and IT. It work especially well in agile contexts in which business and IT work closely together.

But in order to be able to generate proper documentation from XML schema it is necessary to document the schema very thoroughly. Luckily there is a standardized way to do that using <xs:annotation> and <xs:documentation>. The following listing shows how to do it right.


<xs:element name="PerformSimpleCalculationRequest">
  <xs:annotation><xs:documentation>Performs a simple calculation</xs:documentation></xs:annotation>
  <xs:complexType>
    <xs:sequence>
      <xs:element name="operation" type="tns:Operation" minOccurs="1" maxOccurs="1">
        <xs:annotation>
          <xs:documentation xml:lang="EN">Operation to perform</xs:documentation>
          <xs:documentation xml:lang="DE">Operation zur Ausführung</xs:documentation>
        </xs:annotation>
      </xs:element>
      ...
    </xs:sequence>
  </xs:complexType>
</xs:element>

You can see the full listing in the previous blog post.
It is best practice to document every aspect in the schema in a way that can be understood by humans. Ideally not only by technicans but by business people as well. To achive that it is essential to use the right language from the respective business domain. As shown in the listing it is even possible to add documentation in multiple languages.

As XML schema itself is XML we can easily validate and transform it to HTML using XSD and XSLT. A template can be found as part of the example project.

The stylesheet can be linked to the XSD using the directive <?xml-stylesheet type=”text/xsl” href=”contract.xsl”?> within the XSD. If you open the XSD in a web browser it will be transformed right away and show the HTML output.

Alternatively you can transform the XSD on the commandline using msxsl.exe. Just type the following to generate the HTML documentation.

msxsl calculator.xsd contract.xsl -o calculator.html

Another option is to automate the transformation process using the Maven plugin org.codehaus.mojo:xml-maven-plugin as you can see in the following excerpt from the POM file.

<plugin>
	<groupId>org.codehaus.mojo</groupId>
	<artifactId>xml-maven-plugin</artifactId>
	<version>1.0</version>
  <inherited>false</inherited>
  <executions>
		<execution>
			<id>transform</id>
			<goals>
				<goal>transform</goal>
			</goals>
			<phase>install</phase>
		</execution>
	</executions>
	<configuration>
		<transformationSets>
			<transformationSet>
				<dir>api/src/main/resources/xsd</dir>
				<stylesheet>${project.basedir}/repo/transform/xsl/contract.xsl</stylesheet>
				<outputDir>target/repository</outputDir>
				<fileMappers>
					<fileMapper implementation="org.codehaus.plexus.components.io.filemappers.RegExpFileMapper">
						<pattern>^(.*)\.xsd$</pattern>
						<replacement>contract.html</replacement>
					</fileMapper>
				</fileMappers>
			</transformationSet>
		</transformationSets>
	</configuration>
</plugin>

The result is a HTML contract documentation in the target/repository directory. This documentation can for instance be uploaded to a Wiki which serves as a service repository. It is lightweight, easy to use and highly recommended as it greatly helps to increase the likelyness of service reuse.

It is definitely recommended to develop service contracts in workshops with people from IT and business. The person who moderates such a workshop can be called a BizDev, as he/she needs understanding of the business domain and technology alike. Doing that can greatly reduce misconceptions and create awareness of services as reusable business assets. Give it a try!

Turn contracts into code

Interfaces are one of the most important parts in software design. Designing software around properly defined interfaces has many benefits for instance in the areas of consistency, maintainability and reuse. A well written contract describes precisely how software artefacts (or services) interact with each other. Approaches such as Sustainable Service Design or the BiPRO standards rely on contracts based on XML Schema (xsd). As they start with the contract design, they are called contract or schema first approaches.
Once you have a contract the question is how to turn it into code. In the Java world JAXB is the first choice. Lets’s see how we can generate Java sourcecode from the schema.

We start with a simple schema shown in the following listing.

<?xml version="1.0" encoding="UTF-8"?>
<?xml-stylesheet type="text/xsl" href="contract.xsl"?>
<xs:schema
    xmlns:xs="http://www.w3.org/2001/XMLSchema"
    xmlns:xml="http://www.w3.org/XML/1998/namespace"    
    xmlns:service="http://www.pleus.net/services"
    xmlns:tns="http://www.pleus.net/services/calculator/api/model"
	targetNamespace="http://www.pleus.net/services/calculator/api/model"
	elementFormDefault="qualified" attributeFormDefault="qualified"
	version="1.0">
	  
    <!-- ################################################### -->
	<!-- ################### Messages ###################### -->
    <!-- ################################################### -->

    
	<xs:element name="PerformSimpleCalculationRequest">
		<xs:annotation><xs:documentation>Performs a simple calculation</xs:documentation></xs:annotation>
		<xs:complexType>
			<xs:sequence>
				<xs:element name="operation" type="tns:Operation" minOccurs="1" maxOccurs="1">
					<xs:annotation>
                        <xs:documentation xml:lang="EN">Operation to perform</xs:documentation>
                        <xs:documentation xml:lang="DE">Operation zur Ausführung</xs:documentation>
                    </xs:annotation>
				</xs:element>
				<xs:element name="value-a" type="tns:decimal9F2" minOccurs="1" maxOccurs="1">
					<xs:annotation><xs:documentation>First value</xs:documentation></xs:annotation>
				</xs:element>
				<xs:element name="value-b" type="xs:decimal" minOccurs="1" maxOccurs="1">
					<xs:annotation><xs:documentation>Second value</xs:documentation></xs:annotation>
				</xs:element>
			</xs:sequence>
		</xs:complexType>
	</xs:element>
    
	<xs:element name="PerformSimpleCalculationResponse">
		<xs:annotation><xs:documentation>Result of a simple calculation</xs:documentation></xs:annotation>
		<xs:complexType>
			<xs:sequence>
				<xs:element name="result" type="xs:decimal" minOccurs="1" maxOccurs="1">
					<xs:annotation><xs:documentation>Result</xs:documentation></xs:annotation>
				</xs:element>
			</xs:sequence>
		</xs:complexType>
	</xs:element>
    

   <xs:element name="CalculatorError">
   	  <xs:annotation><xs:documentation>Provides error information</xs:documentation></xs:annotation>
      <xs:complexType>
         <xs:sequence>
				<xs:element name="message" type="xs:string" minOccurs="1" maxOccurs="1">
					<xs:annotation><xs:documentation>Fehlermeldung</xs:documentation></xs:annotation>
				</xs:element>
				<xs:element name="code" type="xs:int" minOccurs="1" maxOccurs="1">
					<xs:annotation><xs:documentation>Fehlercode</xs:documentation></xs:annotation>
				</xs:element>
         </xs:sequence>
      </xs:complexType>
   </xs:element>
	
    <!-- ################################################### -->
    <!-- ################# Type definitions ################ -->
    <!-- ################################################### -->

	<!--  Enum type  -->
	 <xs:simpleType name="Operation">
	    <xs:annotation><xs:documentation>Defines the arithmetic operations</xs:documentation></xs:annotation>
		<xs:restriction base="xs:string">
			<xs:enumeration value="ADD"><xs:annotation><xs:documentation>Add</xs:documentation></xs:annotation></xs:enumeration>
			<xs:enumeration value="SUBTRACT"><xs:annotation><xs:documentation>Substract</xs:documentation></xs:annotation></xs:enumeration>
			<xs:enumeration value="MULTIPLY"><xs:annotation><xs:documentation>Multiply</xs:documentation></xs:annotation></xs:enumeration>
			<xs:enumeration value="DIVIDE"><xs:annotation><xs:documentation>Divide</xs:documentation></xs:annotation></xs:enumeration>
		</xs:restriction>
	</xs:simpleType>

        <xs:simpleType name="decimal9F2">
          <xs:restriction base="xs:decimal">
            <xs:totalDigits value="9"/>
            <xs:fractionDigits value="2"/>
          </xs:restriction>
        </xs:simpleType>

</xs:schema>

The schema is part of an example project which can be downloaded here.

A more appealing representation would look as follows:

In order to turn this schema into code we can call the xjb tool which is part of the Java SDK on the command line like this:

xjc calculator.xsd

As a result we get Java code that we can incorporate in our code base. Another option is to generate the Java code from our Maven build. This can be achieved by adding following Maven Plugin to your pom.


<plugin>
	<groupId>org.jvnet.jaxb2.maven2</groupId>
	<artifactId>maven-jaxb2-plugin</artifactId>
	<version>0.8.1</version>
	<executions>
		<execution>
			<goals>
				<goal>generate</goal>
			</goals>
		</execution>
	</executions>
	<configuration>
		<schemaDirectory>${project.basedir}/src/main/resources/xsd</schemaDirectory>
		<bindingDirectory>${project.basedir}/src/main/resources/xsd</bindingDirectory>  
                <generatePackage>net.pleus.services.calculator.api.model</generatePackage>
	</configuration>
</plugin>

As a result we get basic Java classes that represent the messages and types defined in our schema. If you want to affect the way the code is generated you can provide xjb binding files to customize the generated code. If you want for example use java.util.Calendar to be generated for an xsd:date type you can use the following binding:


<jaxb:bindings version="2.1"
    xmlns:jaxb="http://java.sun.com/xml/ns/jaxb"
    xmlns:xjc="http://java.sun.com/xml/ns/jaxb/xjc"
    xmlns:xsd="http://www.w3.org/2001/XMLSchema">
    <jaxb:globalBindings generateElementProperty="false">
      <jaxb:javaType name="java.util.Calendar" xmlType="xsd:date"  
             parseMethod="javax.xml.bind.DatatypeConverter.parseDate"  
             printMethod="javax.xml.bind.DatatypeConverter.printDate">
      </jaxb:javaType>  
    </jaxb:globalBindings>   
</jaxb:bindings> 

Just drop the file jaxbbinding.xjb in the the same directory as your xsd file.

The foundation
We now have a simple Java class without any additional features:

JAXB comes with very useful plugins to pimp our generated code.

HashCode, equals, toString
If we want standard operations such as hashCode, equals or toString we can use the plugin org.jvnet.jaxb2_commons:jaxb2-basics.

This gives us:

Value Constructor
If we want value constructors, we can use the plugin org.jvnet.jaxb2_commons:jaxb2-value-constructor.

The result is:

Fluent APIs
Fluent APIs can be generated with the plugin net.java.dev.jaxb2-commons:jaxb-fluent-api.

This gives us a very nice fluent API to produce intuitive and readable code.

Bean Validation
One great aspect of schema first design is that one can nicely define types and constraints like tns:decimal9F2 shown in the listing at the top of this page. Wouldn’t it be nice if we could check those constraints in our code without additional effort? The plugin com.github.krasa:krasa-jaxb-tools generates JSR349 compliant bean validation annotations from our XSD types. After running the build we get annotated classes shown below for valueA which appears in the xsd as tns:decimal9F2:


@NotNull
@Digits(integer = 7, fraction = 2)
protected BigDecimal valueA;

To trigger the validation from your code we just need the following code snippet:


import javax.validation.*;

ValidatorFactory validatorFactory = Validation.buildDefaultValidatorFactory();
Set<ConstraintViolation<PerformSimpleCalculationRequest>> violations = validatorFactory.getValidator().validate(request);
for(ConstraintViolation<PerformSimpleCalculationRequest> violation : violations){
  System.out.println("Violation: " + violation);
}

Javadoc
And finally it would be nice to have the documentation from within the XSD file in the generated Java code as well.
This can be achieved by the org.dpytel.jaxb:xjc-javadoc plugin.

If you have additional needs to manipulate the generated code, you can implement your own JAXB plugin which can be hooked into the build process. This gives you maximum flexibility and full control of the code generation.

The entire plugin configuration is shown here:


	org.jvnet.jaxb2.maven2
	maven-jaxb2-plugin
	0.8.1


				generate


		true
		>net.pleus.services.calculator.api.model
		
			-Xinheritance
			-XtoString
			-XhashCode
			-Xequals
			-Xvalue-constructor
			-Xfluent-api
                        -XJsr303Annotations
		
		${project.basedir}/src/main/resources/xsd
		${project.basedir}/src/main/resources/xsd
		
			
				org.jvnet.jaxb2_commons
				jaxb2-basics
				${jaxb2-basics.version}
			
			
				org.jvnet.jaxb2_commons
				jaxb2-value-constructor
				${jaxb2-value-constructor.version}
			
			
				net.java.dev.jaxb2-commons
				jaxb-fluent-api
				${jaxb-fluent-api.version}
			
			
     				com.github.krasa
				krasa-jaxb-tools
				${krasa-jaxb-tools.version}
			
                        
		                org.dpytel.jaxb
  		                xjc-javadoc
		                ${xjc-javadoc-version}


In this post I’ve shown how to turn contracts into code on the Java platform easily. The contracts are 100% reusable, interoperable and cross platform, of instance on the .NET platform. Here you would use svcuitl.exe to turn the contract into code.

In part two I’m going to show how to turn contracts in into documentation.

Free Visual XML Schema Designer

Those of you who utilize a contract first design such as in Sustainable Service Design have the need to edit XML Schema files frequently. If you are like me you are using a plain text or xml editor, as it gives you the greatest flexibility to express exactly what you want.
But sometimes it is great to have a visual representation. For instance when you discuss business related interfaces with people from the business. Eclipse is somewhat limited in this regard as it does not show the structures and types in context.

Visual Studio.NET comes with a great XML Schema designer which is part of the professional edition for a long time. Now Microsoft offers the Visual Studio.NET Community Edition which is a fully featured Visual Studio including the XML Schema designer for free.

Here you can see how it looks like:

It works even if the types are spread into several XSDs. And it shows the documentation. You don’t even need a Visual Studio project. Just drop the Schema into the IDE and off you go.