Interfaces are one of the most important parts in software design. Designing software around properly defined interfaces has many benefits for instance in the areas of consistency, maintainability and reuse. A well written contract describes precisely how software artefacts (or services) interact with each other. Approaches such as Sustainable Service Design or the BiPRO standards rely on contracts based on XML Schema (xsd). As they start with the contract design, they are called contract or schema first approaches.
Once you have a contract the question is how to turn it into code. In the Java world JAXB is the first choice. Lets’s see how we can generate Java sourcecode from the schema.
We start with a simple schema shown in the following listing.
<?xml version="1.0" encoding="UTF-8"?>
<?xml-stylesheet type="text/xsl" href="contract.xsl"?>
<xs:schema
xmlns:xs="http://www.w3.org/2001/XMLSchema"
xmlns:xml="http://www.w3.org/XML/1998/namespace"
xmlns:service="http://www.pleus.net/services"
xmlns:tns="http://www.pleus.net/services/calculator/api/model"
targetNamespace="http://www.pleus.net/services/calculator/api/model"
elementFormDefault="qualified" attributeFormDefault="qualified"
version="1.0">
<!-- ################################################### -->
<!-- ################### Messages ###################### -->
<!-- ################################################### -->
<xs:element name="PerformSimpleCalculationRequest">
<xs:annotation><xs:documentation>Performs a simple calculation</xs:documentation></xs:annotation>
<xs:complexType>
<xs:sequence>
<xs:element name="operation" type="tns:Operation" minOccurs="1" maxOccurs="1">
<xs:annotation>
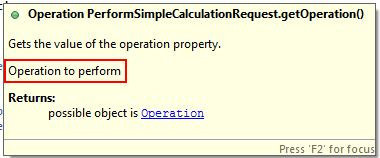
<xs:documentation xml:lang="EN">Operation to perform</xs:documentation>
<xs:documentation xml:lang="DE">Operation zur Ausführung</xs:documentation>
</xs:annotation>
</xs:element>
<xs:element name="value-a" type="tns:decimal9F2" minOccurs="1" maxOccurs="1">
<xs:annotation><xs:documentation>First value</xs:documentation></xs:annotation>
</xs:element>
<xs:element name="value-b" type="xs:decimal" minOccurs="1" maxOccurs="1">
<xs:annotation><xs:documentation>Second value</xs:documentation></xs:annotation>
</xs:element>
</xs:sequence>
</xs:complexType>
</xs:element>
<xs:element name="PerformSimpleCalculationResponse">
<xs:annotation><xs:documentation>Result of a simple calculation</xs:documentation></xs:annotation>
<xs:complexType>
<xs:sequence>
<xs:element name="result" type="xs:decimal" minOccurs="1" maxOccurs="1">
<xs:annotation><xs:documentation>Result</xs:documentation></xs:annotation>
</xs:element>
</xs:sequence>
</xs:complexType>
</xs:element>
<xs:element name="CalculatorError">
<xs:annotation><xs:documentation>Provides error information</xs:documentation></xs:annotation>
<xs:complexType>
<xs:sequence>
<xs:element name="message" type="xs:string" minOccurs="1" maxOccurs="1">
<xs:annotation><xs:documentation>Fehlermeldung</xs:documentation></xs:annotation>
</xs:element>
<xs:element name="code" type="xs:int" minOccurs="1" maxOccurs="1">
<xs:annotation><xs:documentation>Fehlercode</xs:documentation></xs:annotation>
</xs:element>
</xs:sequence>
</xs:complexType>
</xs:element>
<!-- ################################################### -->
<!-- ################# Type definitions ################ -->
<!-- ################################################### -->
<!-- Enum type -->
<xs:simpleType name="Operation">
<xs:annotation><xs:documentation>Defines the arithmetic operations</xs:documentation></xs:annotation>
<xs:restriction base="xs:string">
<xs:enumeration value="ADD"><xs:annotation><xs:documentation>Add</xs:documentation></xs:annotation></xs:enumeration>
<xs:enumeration value="SUBTRACT"><xs:annotation><xs:documentation>Substract</xs:documentation></xs:annotation></xs:enumeration>
<xs:enumeration value="MULTIPLY"><xs:annotation><xs:documentation>Multiply</xs:documentation></xs:annotation></xs:enumeration>
<xs:enumeration value="DIVIDE"><xs:annotation><xs:documentation>Divide</xs:documentation></xs:annotation></xs:enumeration>
</xs:restriction>
</xs:simpleType>
<xs:simpleType name="decimal9F2">
<xs:restriction base="xs:decimal">
<xs:totalDigits value="9"/>
<xs:fractionDigits value="2"/>
</xs:restriction>
</xs:simpleType>
</xs:schema>
The schema is part of an example project which can be downloaded here.
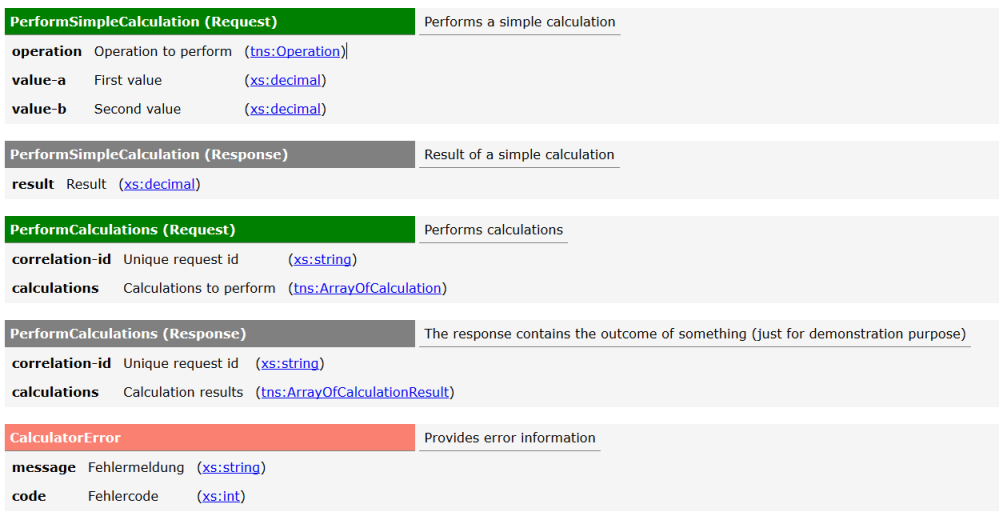
A more appealing representation would look as follows:

In order to turn this schema into code we can call the xjb tool which is part of the Java SDK on the command line like this:
xjc calculator.xsd
As a result we get Java code that we can incorporate in our code base. Another option is to generate the Java code from our Maven build. This can be achieved by adding following Maven Plugin to your pom.
<plugin>
	<groupId>org.jvnet.jaxb2.maven2</groupId>
	<artifactId>maven-jaxb2-plugin</artifactId>
	<version>0.8.1</version>
	<executions>
		<execution>
			<goals>
				<goal>generate</goal>
			</goals>
		</execution>
	</executions>
	<configuration>
		<schemaDirectory>${project.basedir}/src/main/resources/xsd</schemaDirectory>
		<bindingDirectory>${project.basedir}/src/main/resources/xsd</bindingDirectory>
                <generatePackage>net.pleus.services.calculator.api.model</generatePackage>
	</configuration>
</plugin>
As a result we get basic Java classes that represent the messages and types defined in our schema. If you want to affect the way the code is generated you can provide xjb binding files to customize the generated code. If you want for example use java.util.Calendar to be generated for an xsd:date type you can use the following binding:
<jaxb:bindings version="2.1"
    xmlns:jaxb="http://java.sun.com/xml/ns/jaxb"
    xmlns:xjc="http://java.sun.com/xml/ns/jaxb/xjc"
    xmlns:xsd="http://www.w3.org/2001/XMLSchema">
    <jaxb:globalBindings generateElementProperty="false">
      <jaxb:javaType name="java.util.Calendar" xmlType="xsd:date"
             parseMethod="javax.xml.bind.DatatypeConverter.parseDate"
             printMethod="javax.xml.bind.DatatypeConverter.printDate">
      </jaxb:javaType>
    </jaxb:globalBindings>
</jaxb:bindings>
Just drop the file jaxbbinding.xjb in the the same directory as your xsd file.
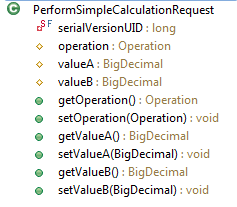
The foundation
We now have a simple Java class without any additional features:
JAXB comes with very useful plugins to pimp our generated code.
HashCode, equals, toString
If we want standard operations such as hashCode, equals or toString we can use the plugin org.jvnet.jaxb2_commons:jaxb2-basics.
This gives us:

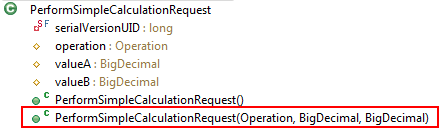
Value Constructor
If we want value constructors, we can use the plugin org.jvnet.jaxb2_commons:jaxb2-value-constructor.
The result is:
Fluent APIs
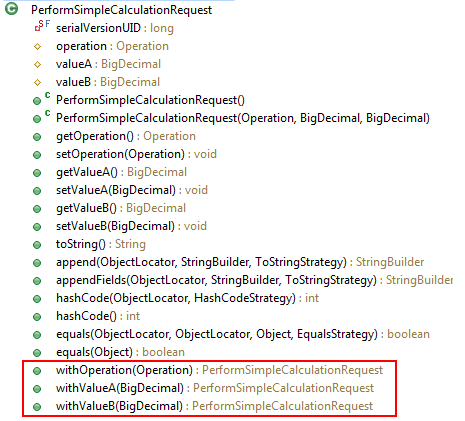
Fluent APIs can be generated with the plugin net.java.dev.jaxb2-commons:jaxb-fluent-api.
This gives us a very nice fluent API to produce intuitive and readable code.
Bean Validation
One great aspect of schema first design is that one can nicely define types and constraints like tns:decimal9F2 shown in the listing at the top of this page. Wouldn’t it be nice if we could check those constraints in our code without additional effort? The plugin com.github.krasa:krasa-jaxb-tools generates JSR349 compliant bean validation annotations from our XSD types. After running the build we get annotated classes shown below for valueA which appears in the xsd as tns:decimal9F2:
@NotNull
@Digits(integer = 7, fraction = 2)
protected BigDecimal valueA;
To trigger the validation from your code we just need the following code snippet:
import javax.validation.*;

ValidatorFactory validatorFactory = Validation.buildDefaultValidatorFactory();
Set<ConstraintViolation<PerformSimpleCalculationRequest>> violations = validatorFactory.getValidator().validate(request);
for(ConstraintViolation<PerformSimpleCalculationRequest> violation : violations){
  System.out.println("Violation: " + violation);
}
Javadoc
And finally it would be nice to have the documentation from within the XSD file in the generated Java code as well.
This can be achieved by the org.dpytel.jaxb:xjc-javadoc plugin.
If you have additional needs to manipulate the generated code, you can implement your own JAXB plugin which can be hooked into the build process. This gives you maximum flexibility and full control of the code generation.
The entire plugin configuration is shown here:
	org.jvnet.jaxb2.maven2
	maven-jaxb2-plugin
	0.8.1


				generate


		true
		>net.pleus.services.calculator.api.model

			-Xinheritance
			-XtoString
			-XhashCode
			-Xequals
			-Xvalue-constructor
			-Xfluent-api
                        -XJsr303Annotations

		${project.basedir}/src/main/resources/xsd
		${project.basedir}/src/main/resources/xsd


				org.jvnet.jaxb2_commons
				jaxb2-basics
				${jaxb2-basics.version}


				org.jvnet.jaxb2_commons
				jaxb2-value-constructor
				${jaxb2-value-constructor.version}


				net.java.dev.jaxb2-commons
				jaxb-fluent-api
				${jaxb-fluent-api.version}


     				com.github.krasa
				krasa-jaxb-tools
				${krasa-jaxb-tools.version}


		                org.dpytel.jaxb
  		                xjc-javadoc
		                ${xjc-javadoc-version}
In this post I’ve shown how to turn contracts into code on the Java platform easily. The contracts are 100% reusable, interoperable and cross platform, of instance on the .NET platform. Here you would use svcuitl.exe to turn the contract into code.
In part two I’m going to show how to turn contracts in into documentation.